Search Knowledge Base
Styles for images/QR-Codes
Important note:
Only apply styles that need to be dynamically changed in the data merge process. All other styles should be directly and manually applied in your layout document. Applying styles in MyDataMerge without needing to change them dynamically makes the merge process slow.
Creating and updating styles
Styles are directly imported from your layout document. If you want to change them, do it in your layout document and save it. MyDataMerge will recognize the change.
Note: If you change a styles name or remove it in your layout document, the style will be removed in your MyDataMerge project everywhere it is assigned.
 

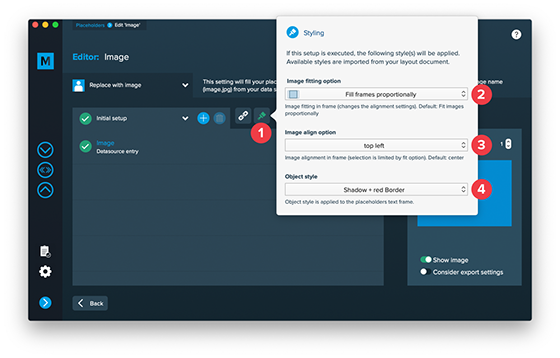
1. Styling indicator
The styling indicator tells you if the currently selected setup has an active style option (=green) or not (=blue/white).
2. Image fitting
This option defines how the image is scaled inside the frame. The following options are available:
![]()  Fit images proportionally [default]
 Fit images proportionally [default]
![]()  Fit images to frames
 Fit images to frames
![]()   Fit frames to images
  Fit frames to images
![]()   Preserve frame and image sizes
  Preserve frame and image sizes
![]()   Fill frames proportionally
  Fill frames proportionally
Note: This styling options works for images and QR-Codes. However – as QR-Codes have to be a squared frame, they will be positioned perfectly centered anyway.
3. Image alignment
This option defines how the image is aligned inside the frame. The following options are available:
- center [default]
- center left
- center right
- top left
- top center
- top right
- bottom left
- bottom center
- bottom right
Note: The available options depend on the image fitting option above.
4. Object style
Usage
Select an object style in the dropdown menu to assign it to the placeholder. An object style will be applied to the placeholders frame.
Test
Test it before! Apply it manually in your layout document while you have your placeholders frame selected to see how it will look like after data merge.
Example
In the below example, an object style is applied that gives a frame a red border.
Before data merge

After data merge
 

