Search Knowledge Base
Basics

How to export multiple records per page
First of all, your layout document has to be prepared correctly. Otherwise,  will disable (grey out) some or all of the above options.
Learn more about the different types here:
Once your layout is correctly set up, the corresponding option will become available.
Note: Selecting an option WILL change the available options in the „Filetype“ section.
Hint: If an option is greyed out you might hover it and the Tooltip might tell you what’s wrong with your layout.
Additional settings
Depending on the option selected, additional settings will become available.
Selected option: „MR per page (generate layout)“
- Additional option: „Do layout settings manually (Adobe® InDesign®)“: If selected, MyDataMerge  will pause once the CSV file is imported and linked so you can do the setup directly in Adobe® InDesign®. If NOT selected, your settings from the export preferences will be applied automatically (this might lead to unwanted looks).
Important Note: Once you have done the setup inAdobe® InDesign®, you CAN start the merge process from Adobe® InDesign® but keep in mind that if you have set up styling or GREP text actions: only MyDataMerge can handle these. So it’s recommended to do your setup in Adobe® InDesign® but start the merge process from MyDataMerge.
Selected option: „MR per page (layout provided)“
- Additional option: Setup additional data merge tags manually
This option becomes available, if Multiple records per page > Layout provided is selected. It allows you to add data merge tags manually inside Adobe® InDesign® before the merge process starts. These data merge tags do not need to follow any rules. You can place them anywhere you like. Open the data merge panel in Adobe® InDesign® once MyDataMerge tells you to do so. From there you can add data merge tags. If you need specific info on how to do that, please check the Adobe help files.
Important: Once you placed additional tags, its important to start the merge process in MyDataMerge, not in Adobe® InDesign® because it cannot handle styling, grep changes and all the other features MyDataMerge offers. - Additional option: Cut and stack style impositions (see below)
Cut and stack style impositions
Cut and stack style impositions allow pre press operators to sort records in specific orders optimized for printing. It becomes available if “MR per page (layout provided)” is selected.
For example:
Having 4 Elements on a page, the standard multiple merge sorting would be:
- Sheet 1: 1,2,3,4
- Sheet 2: 5,6,7,8
- and so on.
With cut and stack style impositions you can resort your records so record 1,2,3,4 are above/below each other:
- Sheet 1: 1,5,9,13
- Sheet 2: 2,6,10,14
- Sheet 3: 3,7,11,15
- Sheet 4: 4,8,12,16
Then a new set starts:
- Sheet 5: 17,21,25,29
- Sheet 6: 18,22,26,30
and so on
After cutting the stacks you have all records below each other in the correct order.
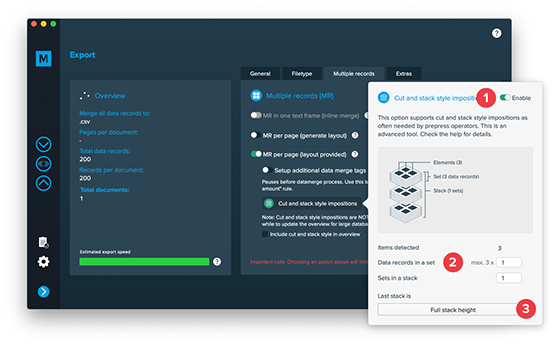
1. Toggle cut and stack style impositions
With this switch you can turn cut and stack style impositions on and off.
Additional option:
Once you activated cut and stack style impositions you can also choose „Include cut and stack style in overview“. While this is fast for small to medium databases it gets slow for large databases – so we decided to make it switchable.
2. Overview
The overview graphic dynamically tells you – based on your settings – how many records per set and how many sets per stack you will have after the export.
3. Settings
You can set the following options:
Data records in a set:
This is the depth of records (think of it as counting sheets of paper). Having 4 elements on 1 page and entering „2“, you will receive 2 sheets with 4 Elements each = 8 data records.
Sets in a stack:
This is the amount of sets per stack
For example:
You have 4 elements on a page. You want to have 25 sheets of paper in a set (25×4 = 100 records in a set) and 4 sets in a stack (100×4 = 400 records in a stack).
So you enter 25 in the field „Data records in a set“ and 4 in the field „Sets in a stack“
Last stack is
This handles how the last records are sorted:
- Full stack height: Will try to fill up the stack to the full height, leaving records empty. This needs more paper but keeps an order.
- Full set height: Will try to fill up the full set which might change the order of the last records. This will save paper.
- Fill sheets: If you don’t need a specific order but need to save paper, this is the option of your choice. It will fill up the last sheets not caring about set or stack height.