1 Datasource preparation & import
Best practices for your datasource
- Must contain more than one data column/title (you can disable this behavior in the import preferences if you have a csv with one column only)
- Cannot contain line breaks inside of the data (just at the end of each data record)
- Each flied has to be separated by one of the following characters: semicolon, comma, tab or vertical bar
- Has to be encoded as MacOS Roman, UTF-8 (recommended), UTF-16BE, UTF-16LE, UTF-32BE or UTF-32LE
Import datasource
Drag and drop your CSV file on the CSV icon or select a file by clicking the folder icon. Note: If you have Excel installed and running, you might see an Excel icon instead. You can still drop your csv file [1] on it and it will change to a CSV icon.
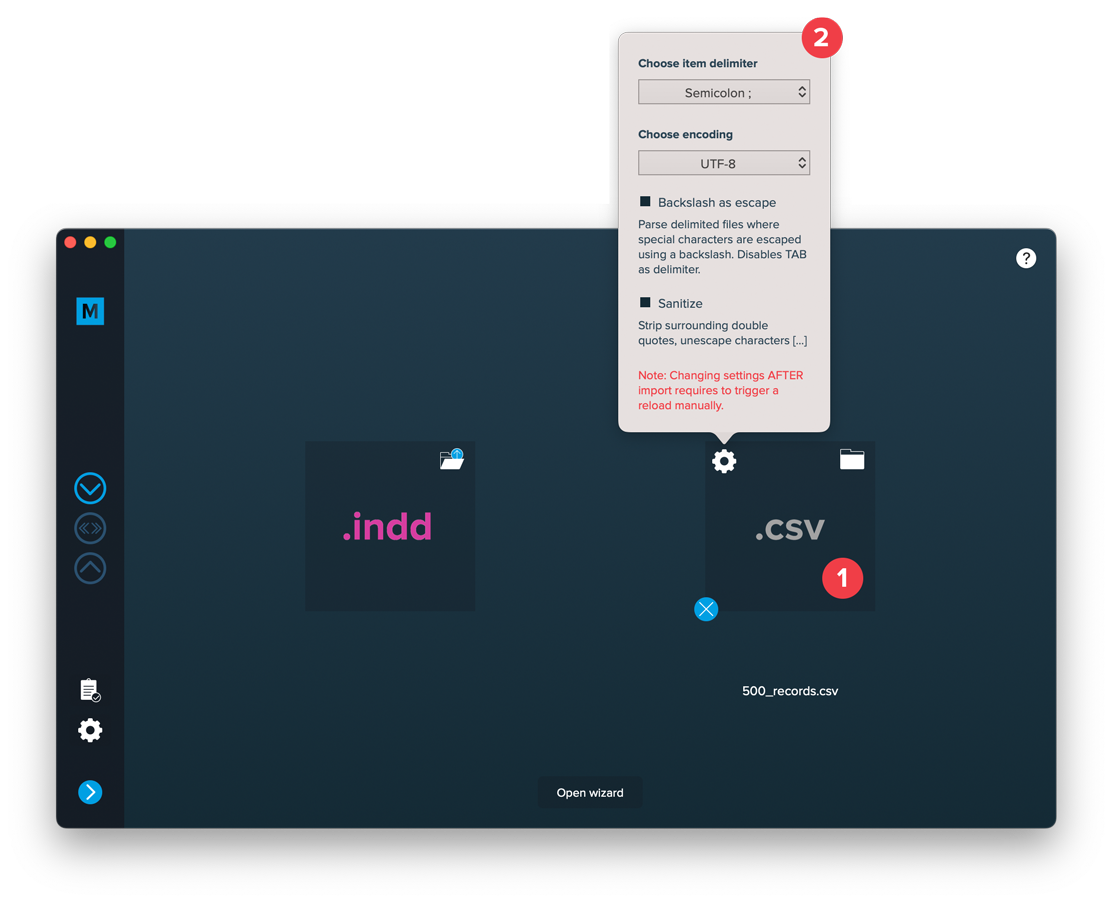
Then the settings will pop up. You must select the correct delimiter and encoding or the import will fail. The other options are optional:
Sanitize
With this option turned off, individual fields will be imported exactly like they are found in the .csv file. If you want these fields to be cleaned (surrounding double quotes stripped, characters unescaped, etc.) you can turn this option on.
Backslash as escape
This option allows you to import files where special characters are escaped with a backslash (the separator, newline etc.)
2 Layout preparation & import
Best practices for your layout
- Always expect long data. When preparing layouts for MyDataMerge, you have to add placeholders to text frames. Please make sure that text frames which contain placeholders are big enough to provide enough room for the data you want to merge in.
- Move unneeded stuff to master pages. Instead of keeping all items on the regular pages, move everything that’s does not need to be merged (like decoration, background images…) to the master page. For large databases, this will speed up the process a lot.
- Do not use styling options if every data record has the same styling. Apply styling in your layout document instead.
- Use locally installed fonts instead of auto downloading them from Adobe Cloud. Adobe Fonts can be installed locally as well in your Adobe Creative Cloud app. When loading them online, this can massively slow down the merge process or lead to errors.
- Scale images down. When merging thousands of data records its necessary to scale images down before the merge. No matter if the images are merged or part of the layout. This can save a lot of processing time.
Multiple records
Multiple records (prepared layout)
This is the most effective approach to apply multiple records to one layout (with one or more pages). To tell MyDataMerge where your records should go in the layout you need to create multiple groups of the same instance.
Example – Multiple business cards with front and rear side
You have a business card that you want to have 8 times on a sheet including their rear sides. First of all, layout one business card with all placeholders you need and group it. By grouping it, MyDataMerge knows now that all the placeholders inside the group belong together.
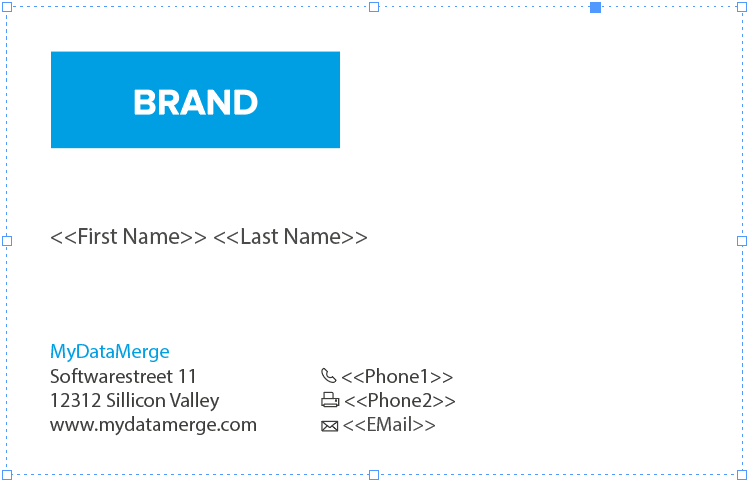
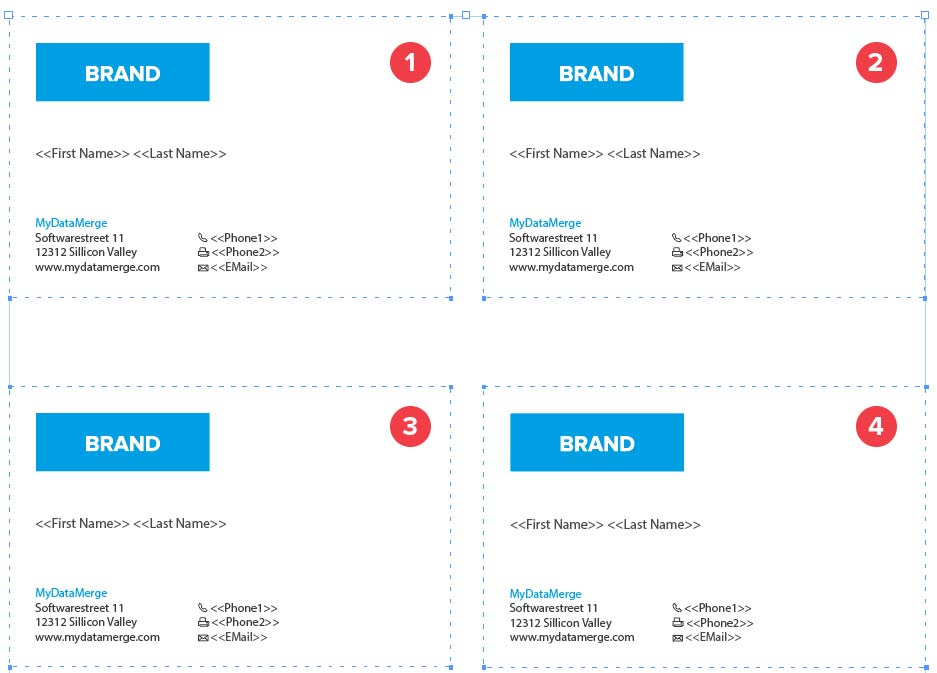
Next, duplicate (or copy/paste) the group to create another business card. Arrange it on your sheet in the order you want the data to be merged. This can be from left to right like in the below example [1 to 4] or right to left, or up to down …
Now on the next page you arrange groups of the rear sides of the business cards, but as the rear side is mirrored you need to start from right to left [1 to 4] with arranging groups:
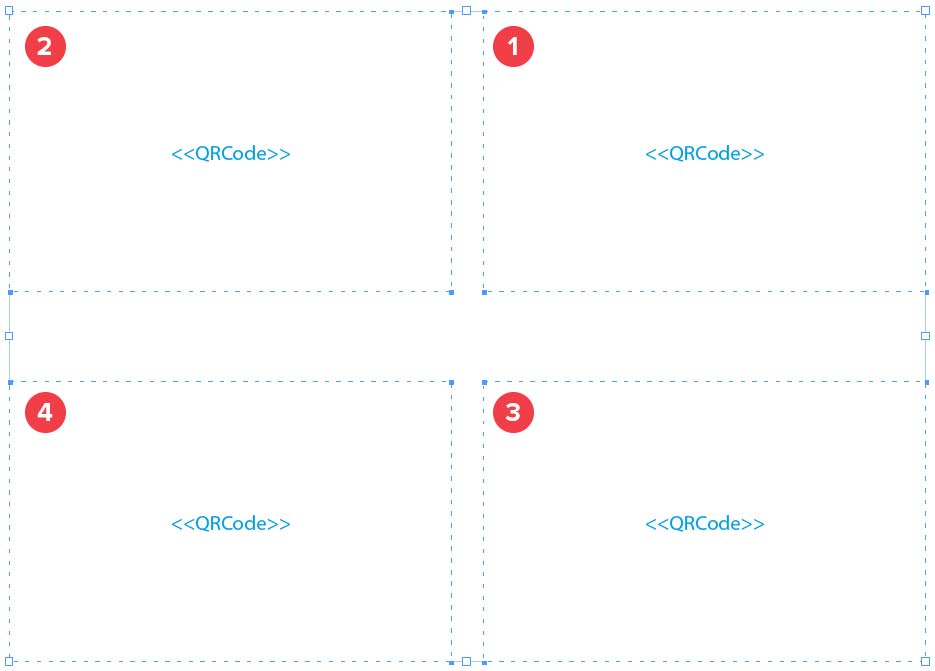
Remember: The groups tell MyDataMerge which placeholders belong together and the order you arrange the copies with represents the order the records are merged.
Import
Import Layout
Importing your layout is easy:
Open MyDataMerge, start a new project and drag and drop your .indd file on the INDD area [1] or select the file by clicking the folder button [2]
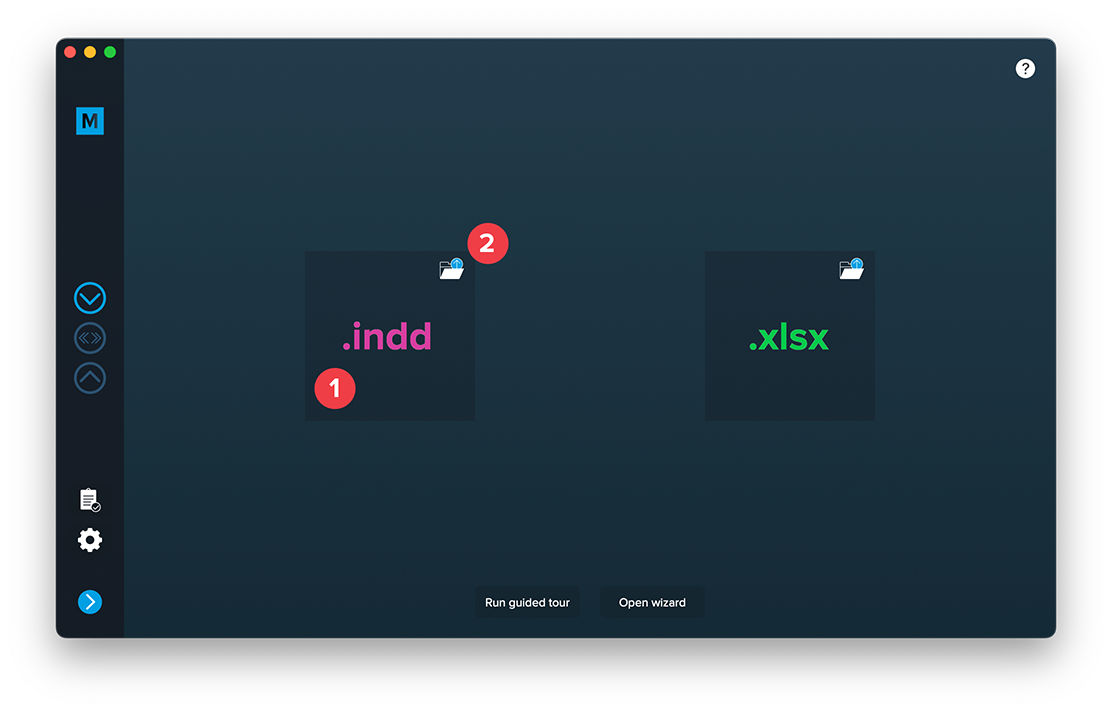
After adding a datasource you can import both files.
Most common issues that may arise
- If you have missing links or fonts, MyDataMerge will throw an error and ask you to fix this
- If you have no placeholders defined (surrounded by << >>), MyDataMerge will throw an error
- If you have auto-download fonts from Adobe Cloud enabled, MyDataMerge will throw an error – this is because InDesign loads these fonts asynchronously and doesn’t let developers (like us) check the loaded state of these fonts. You can bypass this issue by activating the fonts directly in the cloud (so they are always active)
3 Export
Filetypes
Export to Adobe InDesign® files
If you want to export to Adobe InDesign files go to export > filetype and select the preferred filetype from the dropdown.
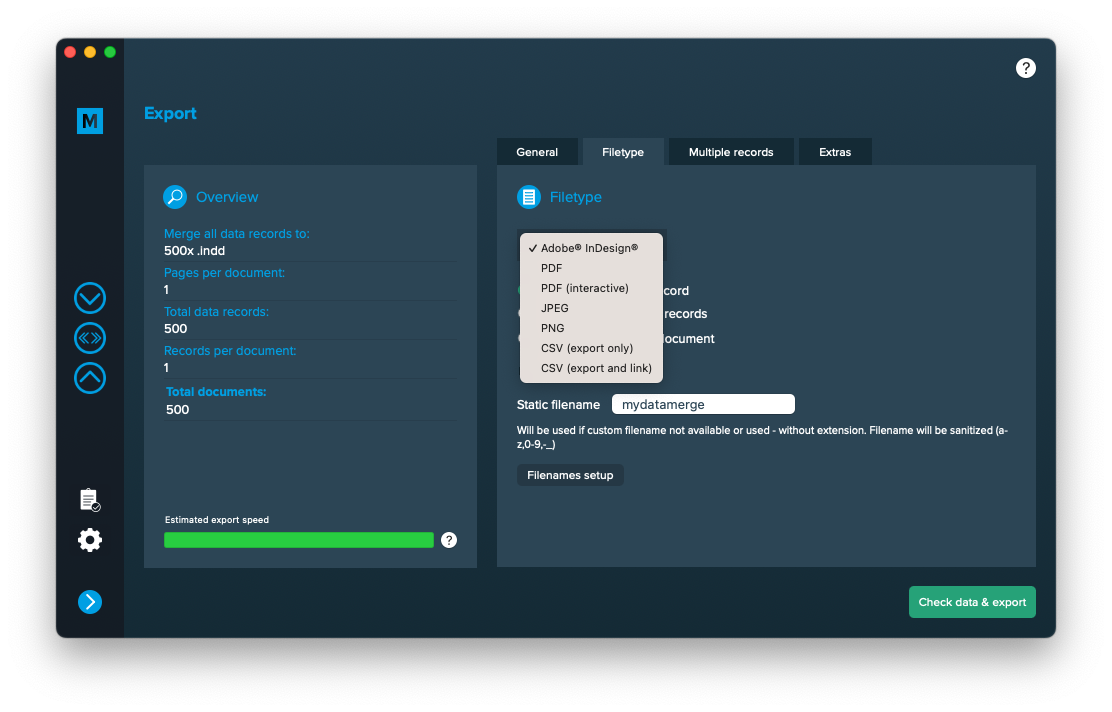
Use a static filename with counting number
You can set a static filename in Export > Filetype > “Static filename” field.
With static filenames, every file will get the same name and a counting number will be attached. For example if you define static filename to be “mydatamerge” then files will be named like this:
- mydatamerge_1
- mydatamerge_2
- mydatamerge_3
- and so on
Please note that static filenames only allow a-z, 0-9, – and _ characters. Other characters will be removed or replaced.
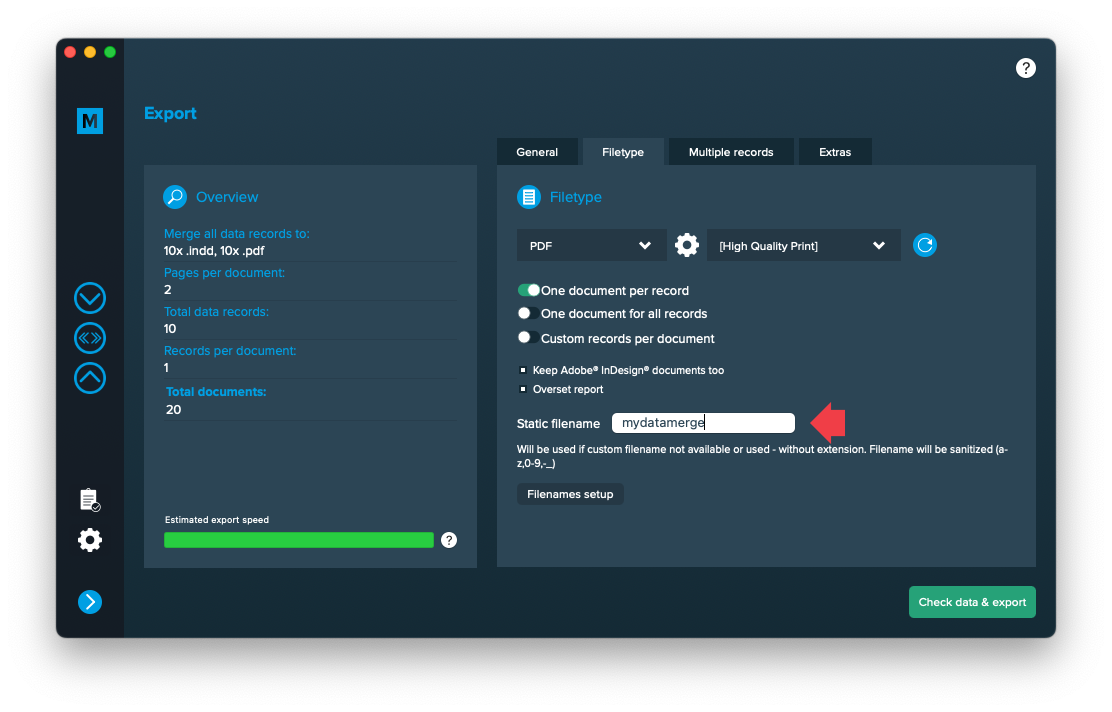
Multiple records
Cut and stack assistance
Cut and stack assistance is an advanced sorting algorithm, especially for pre-print operators. It becomes available if you have selected “Multiple records per page (layout provided)” [1]. Then click the button [2] and enable the assistance [3]:
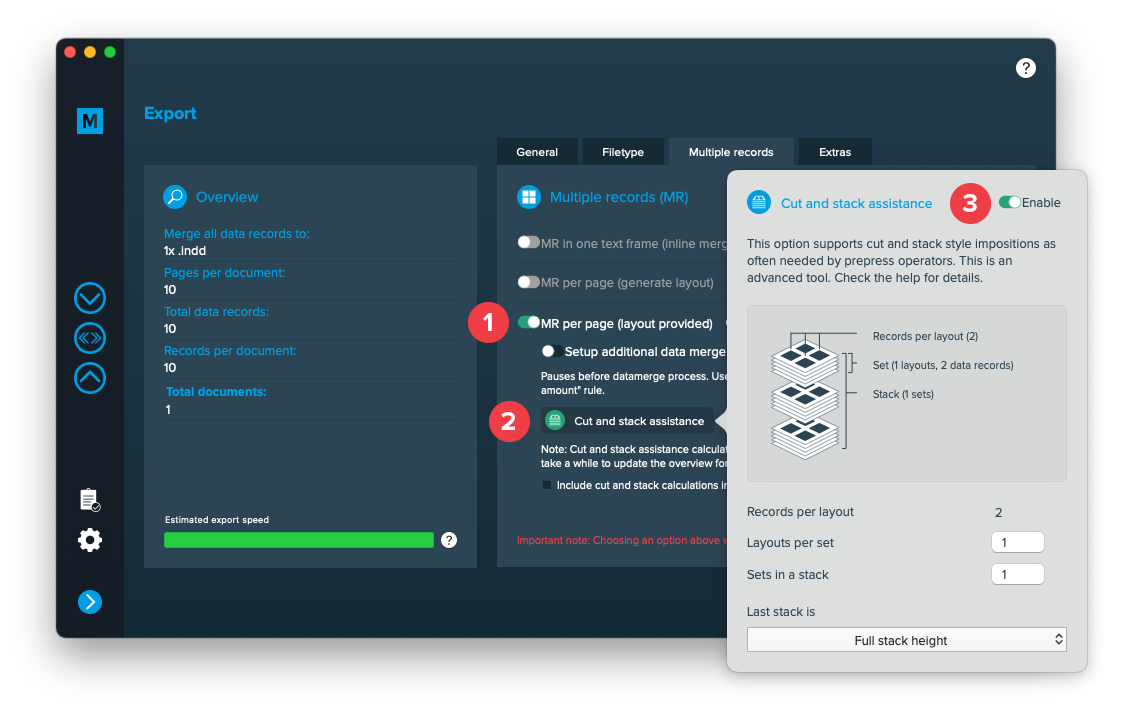
Understanding cut and stack assistance
By default (without cut and stack assistance) multiple records are merged continuously in the order you arranged the copies on a sheet:

With cut and stack style impositions you can configure how records are sorted for cutting:

To make it more clear let’s have a look at the sheets when they are placed on top of each other:
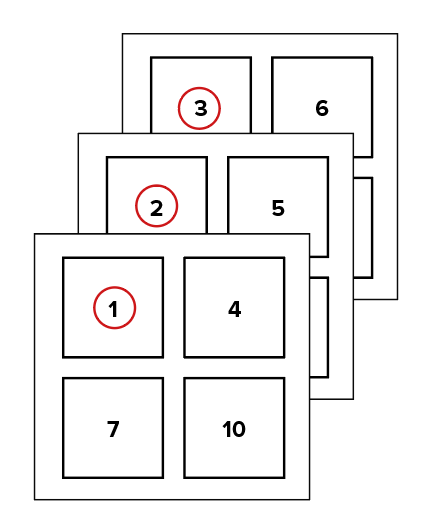
All sequencial records are below each other so that after cutting the sheets, the printer receives 4 stacks with all records in the right order. Once enabled you can apply a few settings:
- The number of layouts per set
- The number of sets in a (paper-) stack
- How to handle the last stack
“Last stack is” option
When the total size of database records don’t divide into equal size stacks, the size of the last stack can be calculated in one of the following ways.
Given a database with 200 records and the following settings:
- Records per layout: 3
- Layouts per set: 10
- Sets in a stack: 5
The following Excel will explain the behaviour to you. The blue represents the first stack, green the last stack.
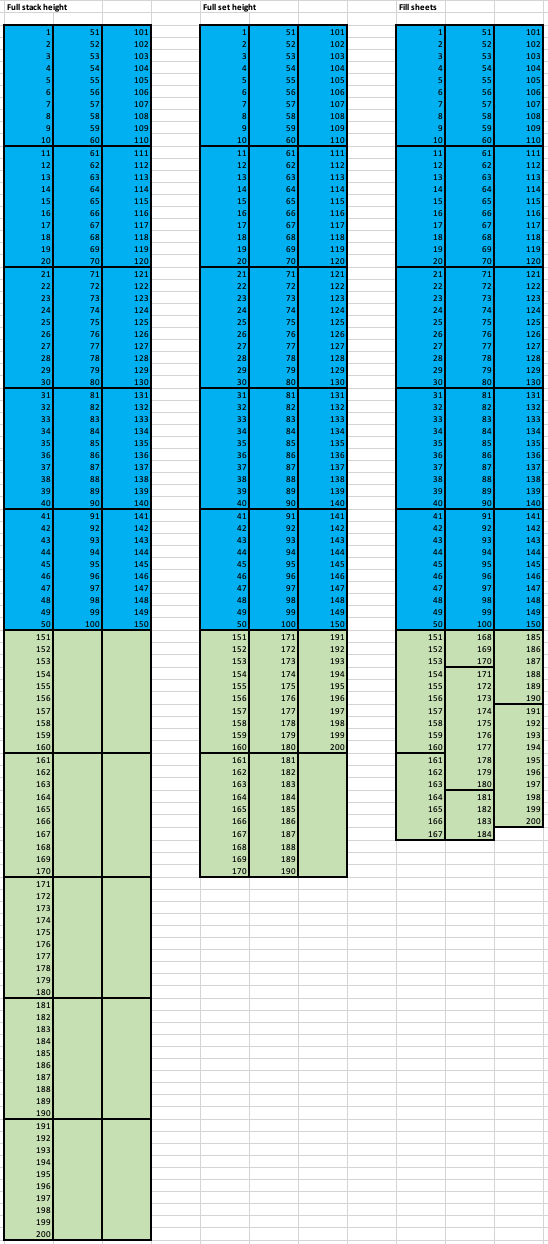
Full stack height (First example):
The last stack will be forced to the full stack height (equal to the other stacks), so records below each other are filled up until the stack height is reached. This will lead to equal height stacks but increases paper usage as parts of the sheets might stay empty.
Full set height (Second example):
The sets of the last stack will be filled with records so that sets are filled up, even if the stack doesn’t reach the same height than the other stacks. It still has some waste of paper but if the printer e. g. uses backing sheets they will be in the right place.
Optimize sheets (Third example):
This will optimize paper usage but is not recommended if e. g. backing sheets are used as they will not be at the right place.